How to write a LaTeX class file and design your own CV (Part 2)
Author: Cody Herring (June 2013)
This is a continuation of How to write a LaTeX class file and design your own CV (Part 1), going over more options for creating a CV, and using class files to do so.
In the last post, we had 2 files created: cv.tex and my_cv.cls. The conten file, cv.tex, contained the following:
\documentclass{my_cv}
\begin{document}
\section{Education}
\datedsubsection{University of Nowhere}{2004-2008}
\section{Work}
\datedsubsection{ABC Limited}{2008-Now}
\end{document}
my_cv.cls contained some formatting defaults, as well as some commands to use:
\NeedsTeXFormat{LaTeX2e}
\ProvidesClass{my_cv}[6/6/2013 custom CV class]
\LoadClass{article}
\RequirePackage{titlesec}
\titleformat{\section}       % Customise the \section command
{\Large\scshape\raggedright} % Make the \section headers large (\Large),
                             % small capitals (\scshape) and left aligned (\raggedright)
  {}{0em}            % Can be used to give a prefix to all sections, like 'Section ...'
  {}                 % Can be used to insert code before the heading
  [\titlerule]       % Inserts a horizontal line after the heading
  \titleformat{\subsection}
  {\large\scshape\raggedright}
  {}{0em}
  {}
\newcommand{\datedsection}[2]{%
  \section[#1]{#1 \hfill #2}%
}
\newcommand{\datedsubsection}[2]{%
  \subsection[#1]{#1 \hfill #2}%
}
This generates the following document:

The #1 and #2 refer to the first and second argument or parameter that are being passed into the command. In the first line of a \newcommand, the section in brackets e.g. [2] refers to the number of parameters being passed in to the function. The function can then call these parameters by using #1, #2, and so on, depending on how many parameters were required by the function. Functions with more parameters will be shown later in the article.
We'll continue by adding a name and contact section, as well as continuing with the experience and other sections.
Name and contact information
In a CV, the name is typically at the top, with contact information to call for jobs. This will be accomplished by adding new functions to our class file. The name can be added using a simple function:
\newcommand{\name}[1]{%
  \centerline{\Huge{#1}}
}
This produces a centered, large font name wherever it is used. This can be called like so:
\name{John Smith}
Now, for contact information. Add the following to the class file:
\newcommand\contact[5]{%
    \centerline{%
        \makebox[0pt][c]{%
            #1 {\large\textperiodcentered} #2 {\large\textperiodcentered} #3
            \ #4 \ \ #5%
        }%
    }%
}
Then call the function from the document:
\contact{123 Broadway}{London}{UK 12345}{john@smith.com}{(000)-111-1111}
All of this displays nicely, with the name and contact information like so:

This displays contact information nicely formatted with a bullet break in between. This can be adjusted for longer addresses if necessary by adding a second function:
\newcommand{\longcontact}[5]{%
    \noindent
    #1\hfill {\large\textperiodcentered}\hfill #2\hfill
    {\large\textperiodcentered}\hfill #3\\
    #4\hfill #5%
}

This looks a bit strange with the short information, but if an address is particularly long, it is more flexible to use. The best part of this is that the TeX document requires minimal changes:
\longcontact{123 Broadway}{London}{UK 12345}{john@smith.com}{(000)-111-1111}
This is the main point of using class files. Allowing for minimal changes in the content of the document, and controlling the presentation (how the content is shown) externally.
Expanding the Experience section
A CV should have more than just a listing of jobs. Some description of what was done in the jobs should be added under each item. 3 bullet points per job is a good balance of detail and description. This can easily be adjusted by adding or removing nodes. Add the following to the class file:
\newcommand{\workitems}[3]{%
    \begin{itemize}
    \item #1
    \item #2
    \item #3
    \end{itemize}%
}
Add the following to the .tex file:
\workitems
{Developed new product}
{Improved productivity by 20\%}
{Decreased costs by \$10,000}
Now the experience section is looking a bit more full:

Adding a skills section rounds out the resume. This was done without a class function, as it didn't shorten the LaTeX code much:
\section{Skills}

\begin{tabular}{l l l l}
C\# & T-SQL & Javascript & HTML \\
XML & JSON & SOAP & REST
\end{tabular}
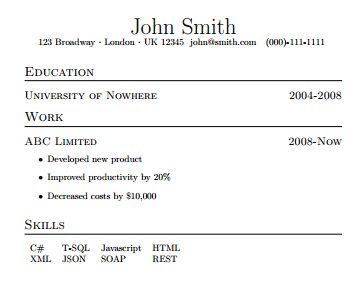
This results in the following:

Conclusion
This two-part article should have left you with a very basic CV template, ready to expand and add new sections.
The entire class file is as follows:
\NeedsTeXFormat{LaTeX2e}
\ProvidesClass{my_cv}[6/6/2013 custom CV class]
\LoadClass{article}
\RequirePackage{titlesec}

\titleformat{\section}
  {\Large\scshape\raggedright}
  {}{0em}
  {}
  [\titlerule]

  \titleformat{\subsection}
  {\large\scshape\raggedright}
  {}{0em}
  {}

\newcommand{\datedsection}[2]{%
  \section[#1]{#1 \hfill #2}%
}
\newcommand{\datedsubsection}[2]{%
  \subsection[#1]{#1 \hfill #2}%
}

\newcommand{\name}[1]{%
  \centerline{\Huge{#1}}%
}

\newcommand\contact[5]{%
    \centerline{%
        \makebox[0pt][c]{%
            #1 {\large\textperiodcentered} #2 {\large\textperiodcentered} #3
            \ #4 \ \ #5%
        }%
    }%
}

\newcommand{\longcontact}[5]{%
    \noindent
    #1\hfill {\large\textperiodcentered}\hfill #2\hfill
    {\large\textperiodcentered}\hfill #3\\
    #4\hfill #5%
}

\newcommand{\workitems}[3]{%
    \begin{itemize}
    \item #1
    \item #2
    \item #3
    \end{itemize}%
}
The .tex file is as follows:
\documentclass{my_cv}
\begin{document}
\name{John Smith}
\contact{123 Broadway}{London}{UK 12345}{john@smith.com}{(000)-111-1111}
\section{Education}
\datedsubsection{University of Nowhere}{2004-2008}
\section{Work}
\datedsubsection{ABC Limited}{2008-Now}
\workitems
{Developed new product}
{Improved productivity by 20\%}
{Decreased costs by \$10,000}

\section{Skills}
\begin{tabular}{l l l l}
C\# & T-SQL & Javascript & HTML \\
XML & JSON & SOAP & REST
\end{tabular}

\end{document}
This results in the following document:

This tutorial should give a great starting point for a CV, with room for expansion.